If you’ve ever marveled at the artistry of a Dragon Roll at your favorite sushi spot, you’re in for a treat. In this guide, I’ll show you how to make my version of this incredibly popular roll. I say "my version" because the Dragon roll can be totally different depending on the restaurant you go to. It's often interchanged with the Caterpillar roll making it very confusing on what actually goes into each roll. So let's dive into what a dragon roll actually is and more importantly, how to make it!

🐉Dragon vs Caterpillar
Like many other extravagant rolls, there's really no concrete rule on what exactly goes inside a dragon roll. Simply put, both dragon and caterpillar rolls have thin slices of avocado layered on top to make them look like a caterpillar or the scales of a dragon. However, typically dragon rolls include shrimp tempura while caterpillar rolls have unagi (freshwater eel) inside. That's how I differentiate the two at least.
With that said though, in my version, I like to incorporate both shrimp tempura and unagi, simply because they taste so good together! It's a flavor bomb of savory unagi, crispy shrimp tempura, creamy avocado, refreshing cucumber, and sweet, tangy sushi rice.
Plus, everything is fully cooked which makes it a crowd pleaser, even for those non-sushi eaters that somehow showed up to your sushi party.
Jump to:
🍲Ingredients
Main Ingredients:
- Sushi rice: ½ cup (100g) (sushi rice tutorial here).
- Nori (dried seaweed): 1 half sheet
- Avocado: ¼
- Cucumber (English or Japanese): ¼ of 4 inches (10cm)
- Unagi (freshwater eel): 3-4 oz (85-113g)
- Shrimp: 2 (Size between 16-30) (tail-on)
- Tempurako (tempura flour): ½ cup (60g)
- If you can't find tempurako, you can use all-purpose flour and egg to make your own tempura batter (recipe below).
Toppings and Sauces:
- Spicy mayo: Drizzle to add a bit of kick (my recipe here).
- Unagi sauce: Drizzle to add savoriness and umami (my recipe here).
- Toasted sesame seeds
Optional Condiments:
- Wasabi, pickled ginger, and soy sauce for serving.
Making the sauces from scratch will taste much better but if you're not feeling as ambitious or on a time crunch then store-bought versions work just fine.
👩🍳Preparation
Very first thing you want to do is make the sushi rice, since that takes the longest. I usually start cooking the rice and then prep all the vegetables and other ingredients while the rice cooks.
Cucumber
- Peel and cut the cucumber with a katsuramuki technique (thin rotational peeling), watch my tutorial here if you want to learn how. Or keep it simple and slice it into half-inch wide sticks, cutting out the inner seed section.
Shrimp Tempura
If you want to keep this recipe extremely simple, I recommend getting some pre-fried tempura shrimp. They come frozen and are available at many regular grocery stores. To heat them up, simply follow the directions on the packaging.

If you're frying your own shrimp, follow these steps:
- Peel and devein the shrimp, leaving the tails on.
- Scrape the shrimp tails with the tip of your knife to remove moisture and dirt. This is an IMPORTANT STEP to prevent the tails from exploding in hot oil.
- On the shrimp’s belly side, make shallow cuts cross-wise along it's length.
- Gently flatten and straighten the shrimp by laying the belly side onto the cutting board and applying pressure from the top.
- Make tempura batter by adding ½ cup of tempurako with ½ cup of ice cold water (follow directions on package because every brand is a bit different).
- If making tempura batter from scratch follow this recipe:
- All-purpose flour: ½ cup
- Ice cold water: ½ cup
- Egg (small): 1
- If making tempura batter from scratch follow this recipe:
- Mix the tempura batter with chopsticks (do not use a whisk). Try no to overmix the batter, it's best to keep some of the small clumps in there which gives it a lighter and airy texture.
- Lightly dust the shrimp with flour, then dip into tempura batter.
- Fry in oil heated to 340-350°F for about 2–2.5 minutes, flipping once halfway through.
- Transfer to a cooling rack or plate lined with paper towel.
Unagi (Freshwater Eel)
- Slice unagi into roughly 1.5 inches wide by 2 inches long pieces (slightly smaller than a nigiri-sized portion).
- Broil on high for 5-6 minutes (skin side up) with the heat source roughly 6 inches away.
Avocado
- Cut the avocado in half and use the side without the seed. We won't be using the other half so wrap it in plastic and store in the fridge (leaving the seed intact will help keep the avocado fresh).
- Peel the skin and from the remaining half and place onto cutting board with the flat side down.
- Starting from one end, cut thin slices crosswise at about ⅛ inch thickness, total of about 6-8 slices.
- It's best to do this after the roll is made to help minimize discoloration of the avocado. Tutorial video here.
🍣Rolling the Dragon Roll
Dragon rolls are made as an uramaki (inside-out roll), which has the rice wrapped around on the outside and the seaweed rolled in the inside.
Step 1: Preparing the Makisu
Since the rice is on the exterior, we need to wrap the makisu (bamboo rolling mat) in plastic wrap to keep the rice from sticking. You can watch this video here to learn how to do this properly.
Step 2: Preparing the Nori and Rice
- Place a sheet of nori horizontally with the rough-side-up onto the makisu, leaving about an inch of space between the nori and the bottom of the makisu.
- Dip your hands into a bowl of cold water and spread it around evenly.
- Grab a ball of sushi rice (about the size of an apple) and evenly spread it across the nori, reaching all the way to the edges and corners. Try not to squish the rice and keep it as fluffy as possible.
- Sprinkle a layer of toasted sesame seeds over the rice (optional), then flip the nori so the rice side is down.
Step 3: Adding Fillings
- Add cucumber slices evenly across the middle of the nori, from one end to the other.
- Place the shrimp tempura pieces across the middle with the tails sticking outwards.
Step 4: Rolling
- Wrap the nori around the fillings by using your thumbs to guide the makisu while tucking the filling gently with your forefingers.
- Pull on the top (far) end of the makisu away from you while using your other hand to support the roll. This will help tighten the roll so the fillings won't fall out.
- Apply even and gentle pressure from all sides to shape the roll.
- Press in on the rice on each ends of the roll to make the edges cleaner.
- Wrap in plastic if not cutting right away.
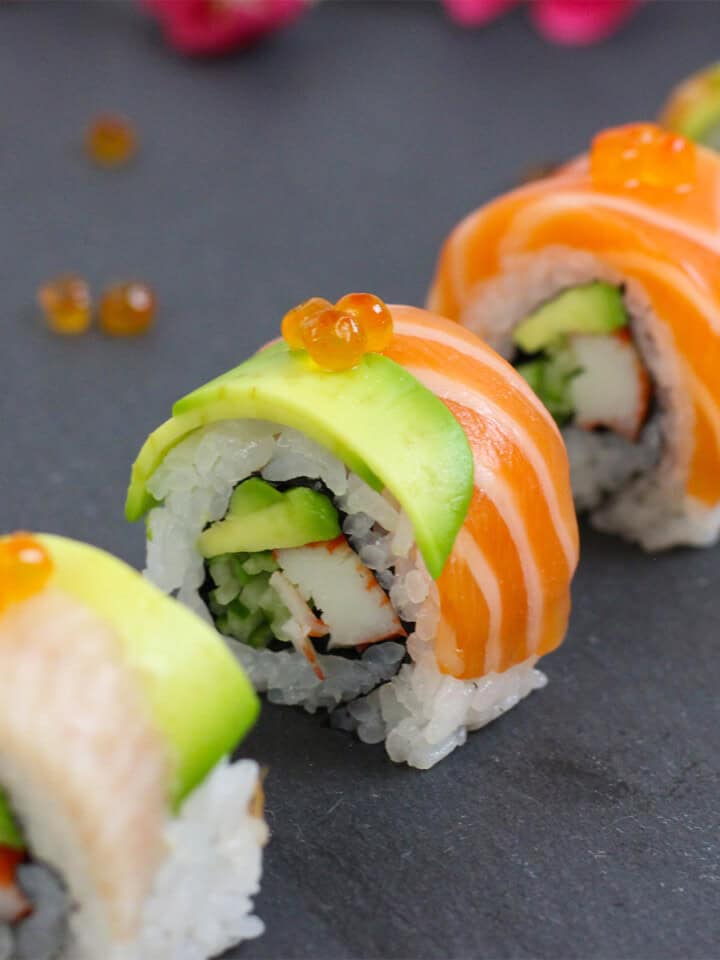
Step 5: Toppings
- Add the broiled unagi pieces on top of the roll, leaving even spaces in between (skin side down).
- Layer a couple slices of avocado in between each unagi piece so that it alternates and covers the entire roll.
- Gently shape the roll again using the plastic-wrapped makisu.
- Wrap in plastic if not cutting right away.
🔪Cutting and Plating
Cutting the rolls can be one of the trickiest parts of sushi making, and often seen as the most difficult part for beginners. Here are some quick tips to help you not mangle your hard work.
- Use a sharp knife. Learn how to properly sharpen Japanese knives with this tutorial here.
- Keep the plastic wrap on while cutting rolls with toppings (like the dragon or caterpillar rolls). Leave the top section of the plastic still intact though so it can easily be removed in one piece.
- You can skip the plastic wrap for rolls without toppings, but the wrap can help ensure cleaner cuts.
- Cut each roll into 8 pieces, starting by cutting right down the center in half, then each half into halves again, and so on.
- Wet and clean your knife between slices to prevent sticking.
After cutting, it’s time to plate. Arrange the rolls neatly (get creative with it), and drizzle on some spicy mayo, unagi sauce, and toasted sesame seeds, optional of course. Add wasabi and pickled ginger on the side. Serve with a small dish of soy sauce.
🥑Customize Your Rolls
I'm sure you've seen dragon rolls with a variety of different ingredients, so feel free to add or swap any of these ingredients to your liking. Some of my other favorite additions include:
- Fresh jalapeño slices for an extra kick.
- Lemon slices to add a hint of citrus.
- Masago or tobiko for a pop of flavor and texture.
- Use asparagus tempura instead of shrimp. My son doesn't like shrimp but he'll eat asparagus any day (no complaints here!).😄
The best part of making sushi at home is that it's endlessly customizable and you can experiment with whatever you think may go well. So put on your creative chef hat and start trying new things!
🪄Tips and Tricks
- Broiling the unagi is a must, otherwise it's cold and chewy.
- Tempura batter should be kept as cold as possible. So keep it in the fridge if you're not using it right away.
- Oil temperature is absolute key when frying tempura. Use a thermometer (here's the infrared one I use) or do the batter check by dropping in a few small droplets into the oil.
- When the temperature is right, the batter should drop down and very briefly hit the bottom of the pan and come straight back up. Watch this video here to learn more.
- Make sure to wet your hands thoroughly (but not drenched) before touching the sushi rice.
- When flipping the nori and rice, leave about an inch of space from the bottom of the makisu to the bottom of the nori. This leaves just enough space which makes it easier to roll.
- Tighten the roll after the initial wrapping of the fillings by pulling the upper end of the makisu away from you while holding the roll with the other hand.
- Clean and wet the knife right before cutting.
🗒Best served with
- Edamame: Go with the lightly salted version (rather than the seasoned edamame) to provide a fresh contrast.
- Miso soup: Always a good pairing with pretty much any type of sushi. The warm and savory soup can act as a nice palate cleanser in between different types of sushi as well.
- Seaweed Salad: The tangy and umami-rich flavors in seaweed salad is always a nice complement to sushi.
- Tsukemono (pickled vegetables): Works as a great palate cleanser and helps balance out the rich and savory flavors of the dragon roll.
- Sake: A chilled junmai or junmai ginjo will be a perfect companion to the flavorful dragon roll. Here's one that I tried very recently that I highly recommend.
✍️Final Thoughts
The Dragon roll is versatile and appeals to a wide audience. The fact that everything is fully cooked makes it easily approachable to sushi newbies and younger kids. The combination of crispy shrimp, savory unagi, and creamy avocado is irresistible, perhaps even for that anti-sushi person in your family. But fair warning, once you start making this, they might keep asking for it over and over again.
🤔Common Questions
I get asked this a lot and I get it, brown rice does have it's great health benefits but I personally would not recommend using it for sushi. Texture is a very important part of sushi and brown rice tends to be too dense and not sticky enough. Traditional white Japanese short grain rice has the perfect consistency and texture. Brown rice also has a earthy flavor to it which can overpower more delicate types of sushi.
Now that said, the best part of making sushi on your own is so that you can make however you like. So by all means, if brown rice is your thing, then go for it. Just know that it may not come out the same.
No, the dragon roll is typically not gluten free. The batter used for frying tempura shrimp normally contains gluten as well as the unagi (freshwater eel) which is covered in a soy-based sweet glaze.
Condiments such as spicy mayo and unagi sauce are a lot of times NOT gluten-free as well. Kewpie mayo (used to make spicy mayo in my recipe) made in the US should be gluten free, however the original ones made in Japan are not. If you live in the States, you'll most likely find US-made Kewpie mayo but just something to be aware of.
Sushi is a very difficult food to keep for later. It needs to be stored in the fridge because of the seafood, but then the sushi rice hardens and gets cold. It's best to eat it as soon as you can but if you have to save it, then make sure to wrap it tightly and keep it in the cooler.
Dragon Roll
VIDEO
EQUIPMENT
- 1 Makisu (bamboo mat)
- 1 Cutting board
- 1 Knife
- 1 Bowl For cold water to wet hands
- 1 Serving plate
- 1 Pot For deep frying
- 1 Chopsticks
INGREDIENTS
- ½ cup sushi rice (make ahead)
- 1 half sheet dried seaweed (nori)
- ¼ avocado
- 4 inches cucumber English or Japanese
- 3-4 ounces unagi freshwater eel
- 2 shrimp size between 16-30
- spicy mayo (drizzle)
- unagi sauce (drizzle)
- toasted sesame seeds
- wasabi
- pickled ginger
- soy sauce
- ½ cup tempurako tempura flour
- 4 cups neutral oil for deep frying
INSTRUCTIONS
Preparation
- Gather all ingredients.
- Prepare the cucumber by cutting it into half-inch wide sticks or peel it using the katsuramuki technique (refer to above).
Shrimp Tempura
- Peel and devein the shrimp, leaving the tails on.
- Scrape the shrimp tails with the tip of your knife to remove moisture and dirt. This is an IMPORTANT STEP to prevent the tails from exploding in hot oil.
- On the shrimp’s belly side, make shallow cuts cross-wise along it's length.
- Gently flatten and straighten the shrimp by laying the belly side onto the cutting board and applying pressure from the top.
- Make tempura batter by adding ½ cup of tempurako with ½ cup of ice cold water (follow directions on package because every brand is a bit different).
- If making tempura batter from scratch follow this recipe:- All-purpose flour: ½ cup- Ice cold water: ½ cup- Egg (small): 1
- Mix the tempura batter with chopsticks (do not use a whisk). Try no to overmix the batter, it's best to keep some of the small clumps in there which gives it a lighter and airy texture.
- Lightly dust the shrimp with flour, then dip into tempura batter.
- Fry in oil heated to 340-350°F for about 2–2.5 minutes, flipping once halfway through.
Unagi (Freshwater Eel)
- Slice unagi into roughly 1.5 inches wide by 2 inches long pieces (slightly smaller than a nigiri-sized portion).
- Broil on high for 5-6 minutes (skin side up) with the heat source roughly 6 inches away.
Avocado
- Cut the avocado in half and use the side without the seed. We won't be using the other half so wrap it in plastic and store in the fridge (leaving the seed intact will help keep the avocado fresh).
- Peel the skin and from the remaining half and place onto cutting board with the flat side down.
- Starting from one end, cut thin slices crosswise at about ⅛ inch thickness, total of about 6-8 slices. It's best to do this after the roll is made to help minimize discoloration of the avocado. Tutorial video here.
Preparing the Roll
- Prepare the makisu (bamboo rolling mat) by wrapping it with plastic.
- Lay the makisu down onto a cutting board with the bamboo sticks running horizontally.
- Place a sheet of nori onto the makisu with the rough side up.
- Wet both hands lightly and grab a ball of sushi rice about the size of an apple.
- Spread it across evenly on the nori, making sure to get all the way to the edges and corners.
- Flip the nori over so that the rice side is down. Leave about an inch of space from the bottom of the makisu to the bottom of the nori (this makes it easier to roll).
Adding Fillings
- Add cucumber slices evenly across the middle of the nori, from one end to the other.
- Place the shrimp tempura pieces across the middle with the tails sticking outwards.
Rolling
- Lift the bottom end of the makisu with your thumbs while holding the fillings in place with your forefingers.
- Bring the mat up and over the fillings until the nori wraps around them completely.
- Pull the makisu from the top (far) end with one hand, while holding the roll in place with the other. This helps tighten the roll so the fillings don't fall out.
- Continue rolling the mat until the nori overlaps onto itself, and then gently apply pressure from all sides using the makisu.
- Press in on the ends of the roll to clean the edges.
Toppings
- Add the broiled unagi pieces on top of the roll, leaving even spaces in between (skin side down).
- Layer a couple slices of avocado in between each unagi piece so that it alternates and covers the entire roll.
- Gently shape the roll again using the plastic-wrapped makisu.
- Wrap in plastic if not cutting right away.
Cutting and Plating
- Place roll onto the cutting board without the makisu.
- Keep the plastic wrap on while cutting rolls with toppings (like the dragon or caterpillar rolls). Leave the top section of the plastic still intact so it can easily be removed in one piece.
- Make sure knife is clean and wet it right before you start cutting.
- Cut the roll right down the center in half first, and then each half into halves again, and now each quarter into halves again. This should total 8 even pieces.
- Arrange the rolls neatly on a plate and add a drizzle of spicy mayo, unagi sauce, and sprinkle on some toasted sesame seeds (optional).
- Serve with some wasabi, pickled ginger, and soy sauce on the side.


Leave a Reply