

If you’ve ever bought a beautiful piece of salmon for sushi, brought it home, and then realized you weren’t quite sure how to cut it, you’re definitely not alone.
Knowing which direction to slice, how thick to make each piece, or even which part of the fillet to use can be confusing at first. And the tricky part is that there isn’t one exact angle or method that works for every piece of salmon.
The good news is that once you understand what you’re looking at and a few basic cutting techniques, the whole process becomes much easier.
In this guide, I’ll show you how I break down and cut a typical boneless salmon fillet for sashimi, nigiri, and sushi rolls. Along the way, you’ll learn how the different parts of the fillet can be used and how to adjust your technique based on the salmon in front of you.
Ultimately, the goal is to help you build the knife skills and confidence to turn that piece of salmon into some amazing sushi at home.
Jump to:
- 🍣 Quick Answer: How Do You Cut Salmon for Sushi?
- 🐟 Start With the Right Salmon
- 🔪 What You Need to Cut Salmon for Sushi
- 🧭 Understanding the Salmon Fillet
- ✂️ Trimming and Shaping the Salmon
- 🌾 Understanding the Grain
- 🍣 How to Cut Salmon for Sashimi
- 🍣 How to Cut Salmon for Nigiri
- 🍣 How to Cut Salmon for Sushi Rolls
- 🍣 How to Use the Rest of the Salmon
- ⚠️ Common Mistakes When Cutting Salmon for Sushi
- 🍣 Final Thoughts
- 🍣 Continue Your Sushi Journey
- ❓ Common Questions (FAQ)
🍣 Quick Answer: How Do You Cut Salmon for Sushi?
To cut salmon for sushi, start by identifying which section of the fillet you’re working with and the direction of the grain. Trim and shape the salmon into a manageable block based on what you plan to make, then generally slice against the grain using one long, smooth pulling motion from the heel of your knife to the tip.
The exact size and angle of your cuts will depend on what you’re making. Sashimi is typically cut thicker, nigiri requires longer slices that are cut relatively thin, and salmon for rolls can simply be cut into strips.
But rather than memorizing one specific knife angle, the most important skill is learning how to work with the salmon you have. That means understanding which sections are best suited for different types of sushi, how to trim and shape them into convenient blocks, and how to adjust your cuts based on their size and shape. That’s what we’ll work through in the rest of this guide.
🐟 Start With the Right Salmon
Before we start cutting, it’s important to make sure you’re starting with the right piece of salmon.
For most people making sushi at home, I recommend farm-raised Atlantic salmon. It has a rich, buttery texture that works extremely well for sushi and sashimi, and it’s also one of the easiest options to find.
For this guide, I’ll be starting with a typical boneless salmon fillet, similar to what you might find at Costco or another grocery store. Most of the trimming and processing has already been done, which makes it much more practical for beginners than starting with a whole salmon.
Now, if you’re wondering whether the salmon you bought is suitable for eating raw, check out my What Does Sushi Grade Actually Mean? and Costco Salmon for Sushi and Sashimi guides. I cover everything from what “sushi grade” actually means to how I choose and prepare Costco salmon for sushi at home.
For now, we’re going to assume you’re comfortable with the salmon you have and focus on what happens next: turning that fillet into sushi.
🔪 What You Need to Cut Salmon for Sushi
The good news is that you really don’t need much when it comes to cutting salmon for sushi. A large cutting board, a clean kitchen towel, and most importantly, a sharp knife will cover most of what you need. And if your salmon still has pin bones, a pair of fish bone tweezers will also come in handy.
Do You Need a Sushi Knife?
No, you don’t need a traditional Japanese sushi knife to cut salmon for sushi.
That said, a yanagiba or sujihiki is great because the longer blade makes it easier to slice through the fish in one smooth stroke. My personal go-to for anything sushi-related is my Masamoto VG Series sujihiki, but a sharp gyuto or regular chef’s knife will work perfectly fine, especially if you’re just getting started.

What matters more than the type of knife is that it’s sharp.
When cutting fish for sushi, you want to use as much of the blade as possible and let the knife do the work. A sharp knife will glide through the salmon cleanly, while a dull blade will force you to apply more pressure or saw back and forth, which can tear or damage the flesh.
If you’re interested in learning more about the different types of sushi knives and which one might be best for you, check out my Best Knife for Sushi guide.
🧭 Understanding the Salmon Fillet
Before you start trimming or cutting anything, take a minute to look at the piece of salmon in front of you.
A salmon fillet isn’t the same from one end to the other. The thickness, shape, texture, and fat content all change depending on which part of the fish you’re working with. Understanding these differences will make it much easier to decide how to trim and cut each piece for sashimi, nigiri, rolls, or something else.

Are You Starting With a Whole Side or a Smaller Portion?
Before we go any further, it’s important to know that your salmon may not look exactly like mine.
If you buy a whole side of salmon, like the Atlantic salmon I typically get from Costco, you have much more control over how you break it down. My preferred method when making sushi is to divide the fillet into four larger sections:
- Back head
- Belly head
- Back tail
- Belly tail

I like this method because the larger sections give me more flexibility when deciding how I want to cut and use each piece.
If you’re starting with a whole side and plan to make a variety of sushi, go ahead and divide the salmon into these four sections. From here, we’ll work with each section individually and trim or shape it depending on what we plan to make.
Another way to portion a whole fillet is to cut it crosswise into smaller sections about three to four inches wide. This can be convenient if you only plan to use a little salmon at a time.
Regular grocery stores such as Trader Joe’s typically sell salmon already cut this way. In that case, one portion will contain both the back and belly, and you obviously won’t be able to divide it into the same four larger sections.
And that’s completely fine. There’s no need to divide it any further right now. The important thing is understanding where that piece came from on the original fillet. Is it closer to the head or tail? Does it contain the fattier belly, the thicker back, or both?
The head end is thicker and wider, while the salmon gradually becomes narrower and thinner toward the tail. The belly generally contains more fat, while the back is firmer and becomes noticeably leaner toward the tail. Those differences will help determine what each piece is best suited for.
Once you can recognize that, you can use the same principles throughout this guide regardless of how the salmon was originally portioned.
Which Part of the Salmon Is Best for Sushi?
Technically, you can use all four sections for sushi, but that doesn’t mean they’re all equally suited for everything.
If I’m breaking down a fillet for a variety of sushi, I typically use the back head section for sashimi first. It has a good balance of meat and fat, but just as importantly, it’s usually the thickest and most uniform section of the fillet. Its natural shape is already fairly close to the rectangular block we want for sashimi, which makes it much easier to cut consistent pieces.
The belly head section is another excellent choice for sashimi or nigiri. It tends to be fattier and more tender, but its wider and thinner shape can make it a little trickier to cut into even pieces. Because I cut my nigiri slices longer than sashimi, I typically like to use this section for nigiri.
As you move toward the tail, the salmon becomes leaner and the shape begins to taper. The belly tail section can still have some great meat, especially the portion closer to the head, and you can absolutely use it for sashimi or nigiri. But because it’s smaller and more tapered, it can be harder to get multiple consistent pieces from it. So I usually save this section for rolls or poke.
The back tail section is my least favorite for sashimi or nigiri, mainly because it becomes increasingly lean toward the tail and doesn’t have as much of that rich, buttery texture I’m looking for. I’ll usually use it for rolls, poke, or simply cook it. A larger tail piece seasoned with salt and grilled as shioyaki is never a bad option either.
If you’re buying salmon that has already been cut crosswise into smaller portions, like you might find at Trader Joe’s or Whole Foods, I would generally look for a piece from the middle of the fillet, slightly toward the head end. You’ll usually get a nice balance of fatty belly and back meat, along with a fairly uniform shape that’s easy to work with.
But remember, these aren’t strict rules. The quality, size, and shape of every salmon fillet will be a little different, and there can be great pieces for sashimi or nigiri outside of these areas as well. So use these as general guidelines and adjust as necessary based on the salmon you have.
Cure the Salmon Before Cutting
Before I start trimming and cutting the salmon for sushi, I typically cure it with salt. This helps firm up the flesh, draw out excess moisture, and improve the overall texture.
I go through my entire curing process in my Costco Salmon for Sushi and Sashimi guide, so I won’t repeat all of it here. From this point on, we’ll assume your salmon has already been properly prepared and is ready to cut.
✂️ Trimming and Shaping the Salmon
Now that your salmon has been divided, cured, and is ready to cut, the next step is to clean up each section or portion and shape it based on what you plan to make.
If you’re starting with a typical boneless salmon fillet from Costco or another grocery store, most of the hard work has already been done for you. But that doesn’t mean every piece will be perfectly ready for sashimi or nigiri right away.
Start by checking for any remaining pin bones. Most grocery store salmon will already have them removed, but occasionally one or two can get missed. Run your fingers gently over the flesh and remove any bones you feel with a pair of fish bone tweezers.
I’ll also trim away any damaged or discolored flesh if needed. The bloodline along the center will most likely have already been trimmed away, but if not, I’ll remove that as well. There’s also usually a tougher, fibrous area along the center where the bloodline was that I like to trim away before shaping the salmon.

Shape the Salmon for What You’re Making
This is where I think beginners sometimes get a little too focused on creating a perfectly rectangular saku block.
A saku is basically a block of fish that has been trimmed and shaped so it’s easier to cut into consistent pieces of sashimi or nigiri. Having a nice, uniform piece definitely makes cutting easier, but your salmon doesn’t need to look like a pixelated orange block from Minecraft.
Instead, look at the piece you have and think about what you’re trying to make.
If a section is too wide for sashimi or nigiri, I might trim off a strip and save it for rolls or poke. Other times, rather than trimming away a large portion just to create the “perfect” block, I’ll divide it into two smaller blocks and adjust the angle of my knife when I slice them.

The goal isn’t to turn your salmon into a geometry project. It’s to create a convenient shape that allows you to cut consistent pieces while getting as much use as possible out of the fish.

And don’t throw those trimmed pieces away. As long as they’re still good to use, we’ll put them to work later for rolls, poke, temaki, or other preparations.
What If Your Salmon Has Skin?
If your salmon still has the skin on, you’ll need to remove it before moving forward. There are several different ways to do this, but for beginners, I recommend keeping it simple.
Personally, I usually like to leave some meat on the skin because I think it tastes better in salmon skin rolls. The simplest way to do this is to lay the salmon on the cutting board with the skin side down. Keep your knife parallel to the board, just above the skin, while gently supporting the salmon from the top with your other hand. Using the middle portion of the blade, work your knife between the flesh and skin with a smooth sawing motion until the skin is separated.
As for the skin, I definitely wouldn’t toss it. You can simply broil it in the oven until it’s nice and crispy, cut it into strips, and serve it with a little spicy mayo on the side. It’s one of my favorite otsumami (Japanese drinking snacks), especially with an ice-cold Japanese lager. At that point, you might forget you were supposed to be making sushi. 🍺
🌾 Understanding the Grain
You’ve probably heard the term “cut against the grain,” whether you’re talking about fish, meat, or something else. But what does that actually mean when it comes to salmon?
With farm-raised Atlantic salmon, one of the easiest ways to see the grain is by looking at the prominent white fat lines running through the flesh. I typically use those lines as a quick visual guide to see which direction the grain is running.
As a general rule, you want to cut against the grain. This shortens the muscle fibers and gives the salmon a softer, more tender texture. It also gives sashimi and nigiri that familiar appearance, with the white lines running across the piece horizontally or diagonally rather than lengthwise.

The nice thing about salmon is that it’s actually pretty forgiving when it comes to this. Those white lines make the grain much easier to see than with some other types of fish, and salmon is naturally soft and tender to begin with. So even if you don’t get the angle exactly right, you’re probably still going to end up with a pretty tasty piece of salmon. And that doesn’t mean every cut needs to cross those lines at a perfect 90-degree angle either. In fact, it usually won’t.
The shape and thickness of the salmon will often require you to change the angle of your knife to get the piece you want. You might cut more diagonally to make a piece longer or lay the blade flatter to make it wider, all while still generally cutting across the grain.
So rather than worrying about finding one perfect angle, think of the grain as your starting point. From there, you can adjust your knife based on the piece of salmon in front of you and what you’re trying to make.
🍣 How to Cut Salmon for Sashimi
When it comes to sashimi, my preferred technique for salmon is called hirazukuri. It’s one of the most common styles of sashimi cutting and works especially well with softer fish like salmon, tuna, and hamachi.
For salmon, I typically start with the back head section if I have the option. As we discussed earlier, it’s usually thick, fairly uniform in shape, and has a good balance of meat and fat. That makes it one of the easiest sections to shape into a convenient block and cut into consistent sashimi pieces.
Shape Your Sashimi Block
If possible, I like my salmon saku to be roughly 2½ inches (6.5 cm) wide and about 1½ inches (4 cm) thick. Now, you don’t have to bust out a ruler or anything, but a block around that size makes the actual slicing pretty straightforward. The length isn’t nearly as important and will mostly depend on the size of the section you’re working with. A longer block will simply give you more slices.

If your piece is already close to that size, there’s no reason to trim it just for the sake of hitting those measurements.
If it's much wider, you have a couple of options. You could trim off a smaller strip and save it for rolls or poke, or, if there’s enough room, divide the section into two smaller blocks.
How Thick Should Salmon Sashimi Be?
For salmon, I generally cut my sashimi pieces somewhere between ¼ and ½ inch (6-13 mm) thick, with about ⅓ inch (8 mm) being my personal preference.
I find that thickness gives you a satisfying bite without making the piece feel too large or heavy. Of course, there’s some personal preference involved here, so don’t worry about being ultra-precise. What's more important is consistency.
How to Make the Cut
If your saku block is fairly uniform and close to the size we discussed above, the actual cut can be pretty simple. Starting from the right end, hold your knife straight across the salmon and perpendicular to the cutting board, then pull the blade through in one long, smooth stroke from heel to tip. Let the blade do the work rather than pressing straight down. We're not cutting carrots here.

Because the knife can stay straight and upright, this is one of the reasons I find hirazukuri so straightforward (pun intended), especially when you’re starting with a nicely shaped saku.

If you have a particularly thin or narrow piece, a more angled slicing technique like sogizukuri may work better. In fact, that’s the technique we’ll use next when cutting salmon for nigiri.
🍣 How to Cut Salmon for Nigiri
Cutting salmon for nigiri is a little different from the hirazukuri technique we just used for sashimi. Instead of a thicker piece of fish served on its own, nigiri requires a longer, relatively thin slice that can drape nicely over the sushi rice.
For nigiri, I generally like to use either the back head or belly head section. Both can make excellent nigiri, but you’ll need to adjust your cut depending on the shape and thickness of the section you’re using.
How Big Should Salmon for Nigiri Be?
As a general guideline, I aim for a finished slice around 1¼ to 1½ inches (3-4 cm) wide and 2½ to 3 inches (6.5-7.5 cm) long. The slice itself should be relatively thin, usually around ⅛ to ¼ inch (3-6 mm).
Again, these aren’t exact measurements you need to follow to a tee. They’re simply a useful reference for understanding the general size and shape you’re trying to create.

How to Make the Cut
For nigiri, I typically use a cutting technique called sogizukuri. One of the biggest differences you’ll notice from the hirazukuri method we used for sashimi is where you start cutting.
With hirazukuri, you start from the right end of the block and make an upright cut through the salmon. With sogizukuri, you start from the left end and use more of a shallow, “shaving” cut, tilting the blade and pulling the knife toward you as you slice.

If you have a thicker, fairly uniform section like the back head, you may be able to keep your knife relatively upright. But if you’re using the belly side, or any section that isn’t thick enough to give you the width you need, you’ll need to start tilting the blade. The flatter you hold the knife against the cutting board, the wider the finished slice will be.
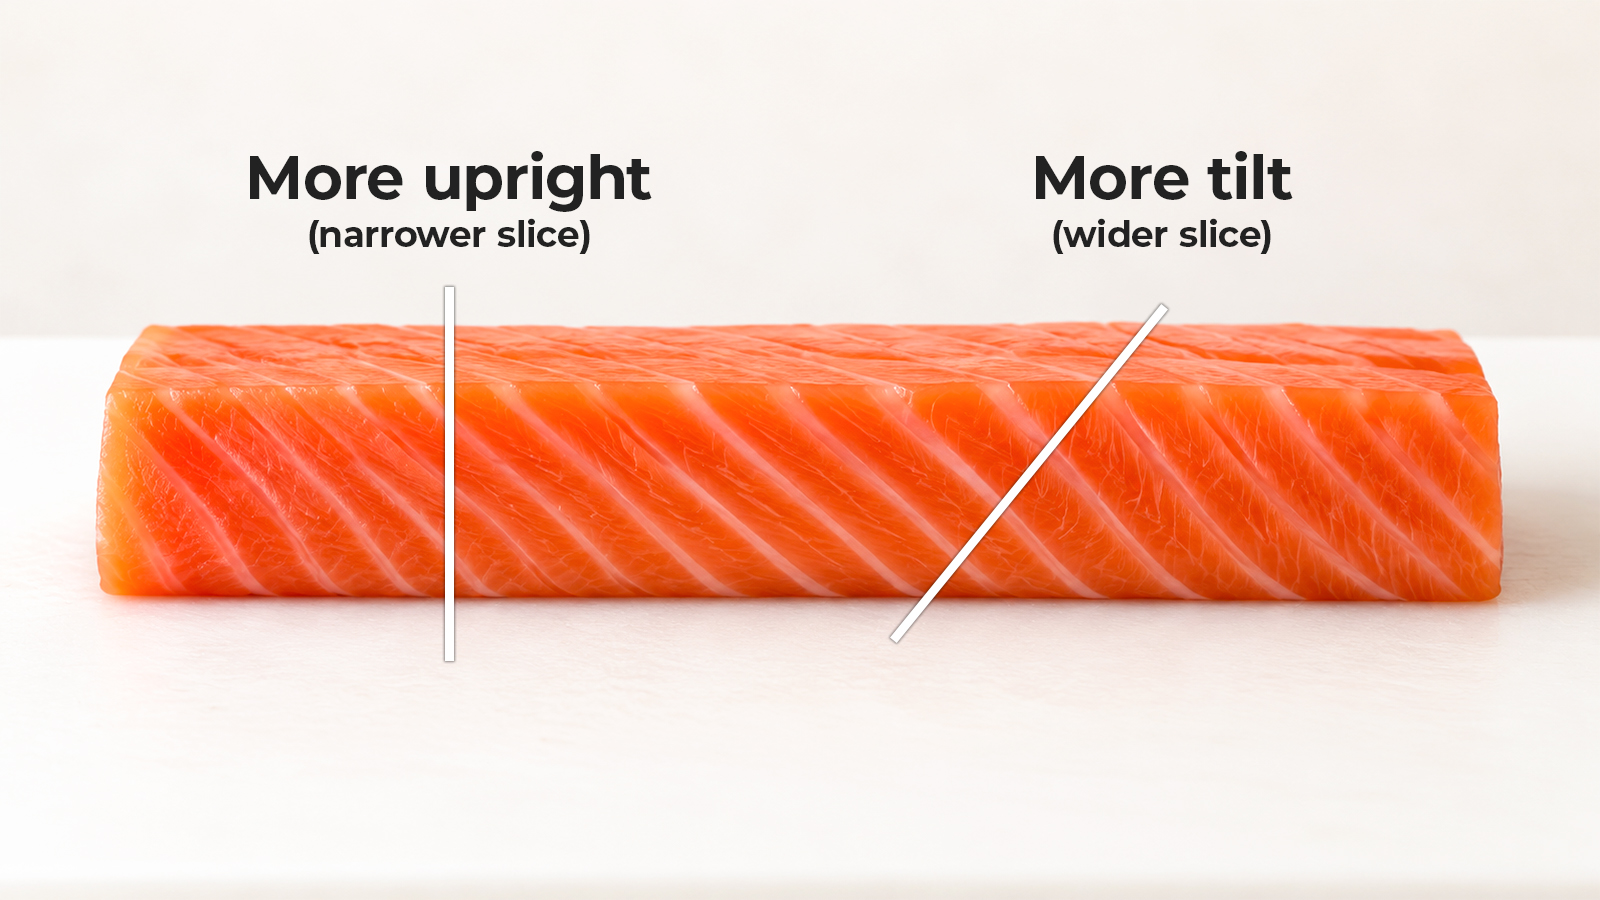
You can also adjust the angle of your cut when looking at the salmon from above. Instead of cutting perpendicular to the block, cutting diagonally gives you a longer slice. This is especially useful when a straight cut wouldn’t give you the length you want for nigiri.

This might sound a little complicated at first, but I promise you don’t need to start breaking out the protractor. The important thing is understanding what each adjustment does. Tilting the blade gives you more width, while cutting diagonally gives you more length.
🔪 The Sushi Man Tip: Creating a Koba
When cutting fish for nigiri, you’ll sometimes see sushi chefs stand the blade upright at the very end of the cut. This technique is called koba-gaeshi, and it creates a small, defined edge on the finished slice called a koba. It’s mainly done to give the fish a cleaner, more refined appearance.
It’s definitely not something you need to worry about when you’re first learning. Focus on getting clean, consistent slices first. But once you’re comfortable with the basic sogizukuri technique, it’s a nice little detail you can practice to refine the appearance of your nigiri.

Adjust Your Cut as the Salmon Changes
One of the trickiest parts about cutting salmon is that the shape usually isn’t perfectly uniform. It may gradually get thinner or narrower, or both, as you make your way through the piece.
Rather than waiting until the shape changes dramatically and then making a big adjustment, I like to gradually change the tilt and angle of my knife from one slice to the next.
For example, if you’re cutting through a belly section that gradually gets thinner, you can slowly lay the blade flatter with each cut to maintain the width of each slice. Making small adjustments as you go will give you much more consistent pieces than suddenly changing from a relatively upright cut to a very shallow one.
The same idea applies as the salmon gets narrower. If you keep cutting at the same angle when looking from above, the slices will eventually become too short. So you want to gradually increase the diagonal angle to help maintain the same length.

Now, if this is all a bit overwhelming, that's completely understandable. It's just one of those things that takes plenty of practice, and probably a lot of awkwardly shaped salmon slices, before you really start to get a feel for it. It's also why starting with a nicely shaped, uniform saku block makes everything so much easier. If the shape stays relatively consistent, you'll probably be able to use almost the same tilt and angle for each slice.
But a lot of times, that's not the case. So pay attention to how the shape is changing and try to think one or two slices ahead. The pieces may not come out exactly the same, but if you understand how to make these adjustments and can anticipate those changes, you’ll have a much easier time getting cleaner, more consistent slices.
🍣 How to Cut Salmon for Sushi Rolls
Compared to sashimi and nigiri, cutting salmon for sushi rolls is much more forgiving. You don’t need a perfectly shaped saku block or carefully angled slices. For most rolls, you’re simply looking for strips of salmon that will fit comfortably inside the roll.
So if you have any trimmings or oddly shaped pieces, this is a great place to use them. If you're working with multiple sections of the salmon, I tend to keep the back tail or belly tail sections for rolls. Their smaller, tapered shape isn’t always ideal for sashimi or nigiri, but works really well here.
For most rolls, I cut the salmon into strips roughly ½ inch by ½ inch (1.25 cm × 1.25 cm). Again, these don’t need to be exact measurements, but strips around that size give you a nice amount of salmon without overfilling the roll.
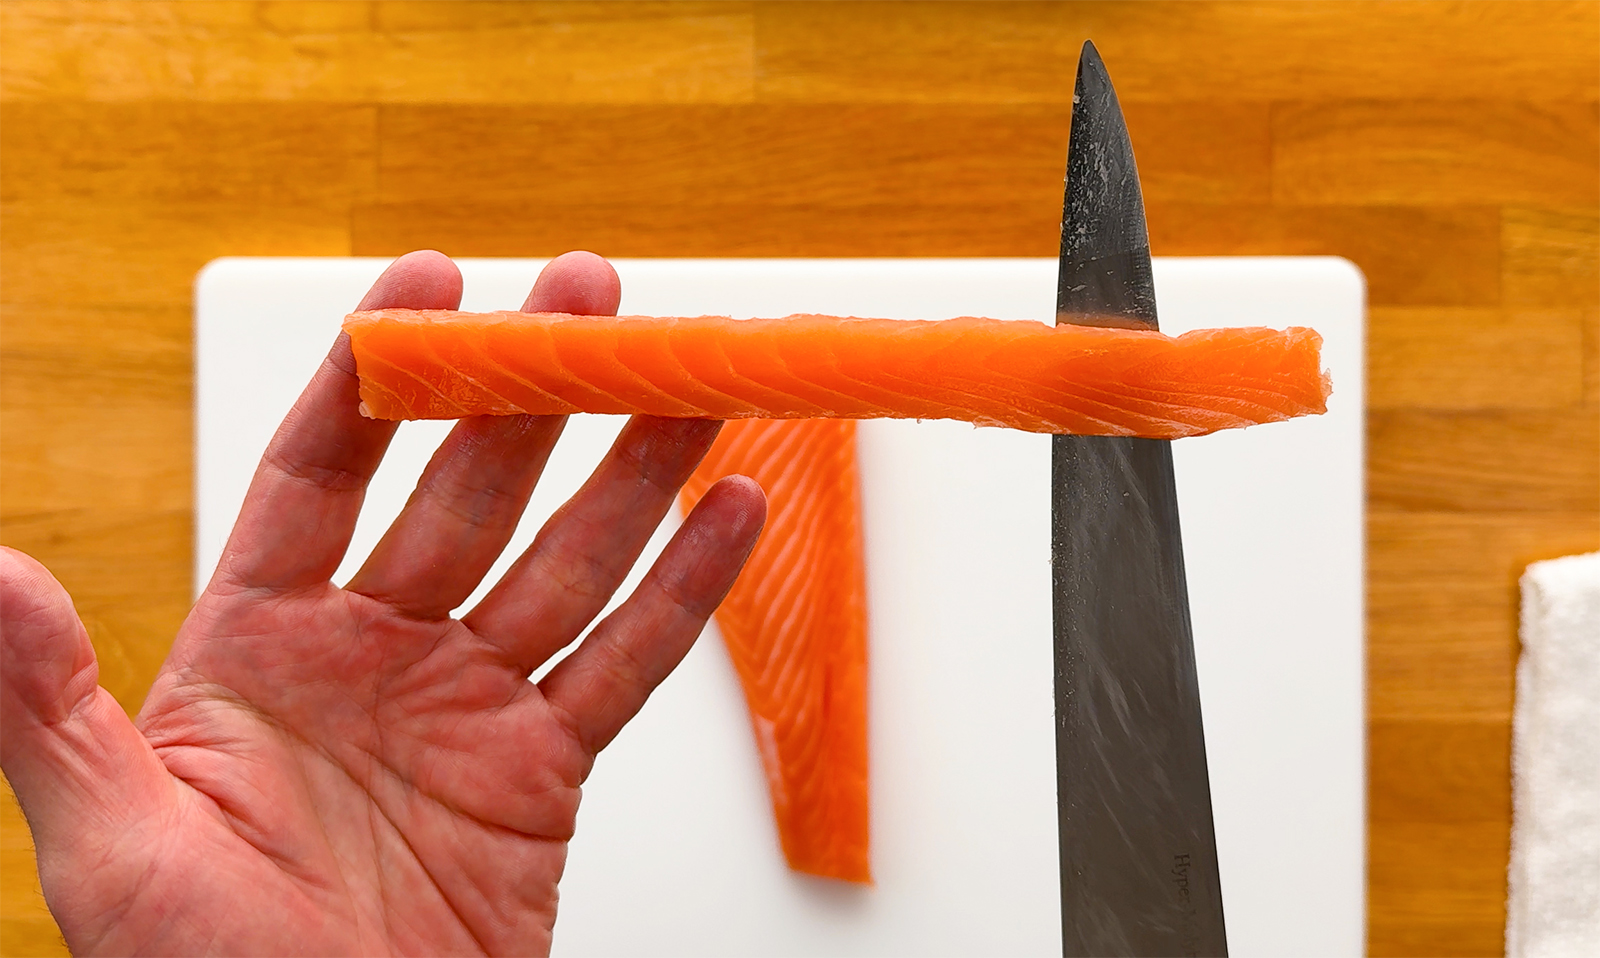
If I know I’m making a bunch of salmon rolls, I’ll usually trim a section of the loin to roughly the length of a sheet of nori first, then cut my strips from there. This makes it easy to lay one continuous strip all the way across the roll.

But there’s absolutely nothing wrong with using shorter pieces. If your salmon isn’t long enough to stretch across the entire sheet of nori, you can just place two or more strips next to each other until you have enough to fill the roll.
And while cutting against the grain is still a good habit, it’s much less noticeable here than it is with sashimi or nigiri. Once the salmon is inside the roll and everything is sliced into individual pieces, the exact angle of your original cut becomes much less important.
🍣 How to Use the Rest of the Salmon
After cutting your sashimi, nigiri, and roll pieces, you’ll probably have some smaller or oddly shaped pieces of salmon left over. There’s no reason to let them go to waste.
Larger pieces and strips can be used for hand rolls, poke, or additional sushi rolls. Smaller scraps are great for chopped spicy salmon or salmon tartare, where the original size and shape of the piece really doesn’t matter.
Now, if I have salmon left over that I no longer feel comfortable eating raw, I’ll simply cook it. One of my favorite ways to use leftovers is salmon soboro, which is basically finely flaked cooked salmon that can be seasoned with salt or soy sauce. It’s great over rice, in ochazuke, or stuffed inside onigiri.
And honestly, that versatility is one of the reasons I almost always buy a whole side of salmon from Costco rather than the smaller portions you typically find at grocery stores. I can break it down for sashimi, nigiri, rolls, and poke, while still having plenty of options for anything I want to cook.
⚠️ Common Mistakes When Cutting Salmon for Sushi
Even once you understand the basic techniques, there are a few common mistakes that can make cutting salmon more difficult than it needs to be.
Using a Dull Knife or Sawing Through the Fish
Your knife doesn’t need to be anything fancy, but it does need to be sharp. A dull knife makes it much harder to get a clean slice and often leads to pressing or sawing through the fish, which can tear or damage the flesh.
Use as much of the blade as possible and try to make one long, smooth pulling motion, especially for sashimi and nigiri.
🔪 The Sushi Man Tip
Keep your knife clean between cuts. You can simply wipe it with a clean, damp kitchen towel or give it a quick rinse when needed. Keeping the blade slightly moist also helps it glide more smoothly through the salmon.
Trying to Use the Same Angle for Every Cut
If you have a nicely shaped and uniform saku block, you actually do want to keep the same angle through each cut. But as we’ve talked about throughout this guide, salmon isn’t always perfectly uniform. The thickness and shape can change quite a bit as you move through the fillet.
As the salmon begins to change, pay attention to the next slice and adjust as needed. This is especially important when cutting nigiri, where small changes in the tilt or angle of your knife can make a big difference in the finished piece.
Over-Trimming the Salmon
A nicely shaped saku block certainly makes cutting easier, but don’t trim away a bunch of good salmon just to create a perfect rectangle. Shape it enough to make it manageable, then adjust your knife angle to work with what you have. Any pieces you do trim can usually be put to good use somewhere else.
Getting Too Focused on Perfect Pieces
Yes, clean and uniform pieces are important and can make your sushi and sashimi look much more professional. But when you’re learning, they're probably not going to look like the beautiful sashimi platter you might see on Instagram or at your favorite sushi restaurant. That takes a lot of practice and plenty of imperfect cuts along the way.
When you’re starting out, focus on making clean cuts, getting the size and thickness relatively consistent, and learning how to work with the shape of the salmon. The more salmon you cut, the easier it becomes to recognize what adjustments you need to make, and the better your cuts will get.
🍣 Final Thoughts
Learning how to cut salmon for sushi can feel a little intimidating at first, especially when you start thinking about the different sections, grain direction, knife angles, and all the ways you can cut the salmon for sashimi, nigiri, rolls, and more.
But if there’s one thing I hope you take away from this guide, it’s that there isn’t one perfect way to cut every piece of salmon.
The shape and thickness of the fish will change depending on the type of salmon and which section you’re working with. Recognizing those differences, deciding how each section can best be used, and adjusting your cuts accordingly is much more useful than trying to memorize a specific knife angle.
And like anything with sushi, it takes practice. Your first few pieces might not look exactly how you pictured them, and that’s completely normal. Pay attention to each cut, think about what you could adjust on the next one, and you’ll be surprised how quickly it starts to feel more natural.
Once you understand how to make the most of each piece of salmon, you can get so much more out of a single fillet and, more importantly, feel a lot more confident turning it into some pretty amazing sushi at home.
🍣 Continue Your Sushi Journey
Related Blog Posts
- Costco Salmon for Sushi and Sashimi
- What Does Sushi Grade Actually Mean?
- Best Fish for Homemade Sushi
- How to Make Sushi Rice
- Easy Sushi Rolls for Beginners
Related Videos
- Costco Salmon for Sushi and Sashimi
- How to Make Nigiri Sushi
- How to Roll Sushi
- How to Make Sushi Rice
❓ Common Questions (FAQ)
If I have a whole side of salmon to work with, I generally prefer the back head section for sashimi. It’s thicker and more uniform in shape, has a nice balance of meat and fat, and is usually the easiest section to shape and cut into consistent pieces.
The belly head can also make excellent sashimi and is fattier and more tender. Ultimately, both can work well depending on the shape of the fillet and what you prefer.
For sashimi, I generally cut salmon between ¼ and ½ inch (6-13 mm) thick, with around ⅓ inch (8 mm) being my personal preference. For nigiri, I cut it thinner, usually around ⅛ to ¼ inch (3-6 mm).
For sushi rolls, I typically cut the salmon into strips roughly ½ inch by ½ inch (1.25 cm × 1.25 cm). These are all general guidelines rather than measurements you need to follow exactly.
Generally, you want to cut salmon against the grain. With farm-raised Atlantic salmon, the prominent white fat lines make the grain relatively easy to see.
That said, you don’t need to cut at a perfect 90-degree angle. Adjust your knife angle as needed based on the shape of the salmon and the type of sushi you’re making.
Hirazukuri and sogizukuri are two different Japanese cutting techniques that I use in this guide.
For hirazukuri, which I typically use for salmon sashimi, you start from the right side of the block and make a thicker, more upright cut through the fish.
With sogizukuri, which I use for nigiri, you start from the left side and use more of a shallow, shaving motion as you pull the knife toward you. By adjusting the tilt and angle of the blade, you can create the longer, wider slices that work well for nigiri.
Leave a Reply